Quantcast
Channel: Share Your Work - Processing 2.x and 3.x Forum
Viewing all 428 articles
Browse latest View live

3D TowerDefense game

$
0
0

Hi,

I just found this "Share your work" category so I thought i could share my last Processing project, as I put quite some work in it.

It is, as the title might suggest, a tower defense game in 3D. I put some more details in the GitHub README:

A tower defense game made in Processing - download at https://processing.org/download/

This is a tower defense game that I created for my computer science / IT class. Basically it's just a 2D interface floating in a 3D space with a 3D "terrain" laid over it.

It it possible to create paths for the enemies and export them by pressing 'x' on the keyboard (prints a line of code that can be pasted in a function to permanently add the path.

Most comments are in German, they were added to explain reasons for specific code to my teacher. For the code itself, e.g. variables or methods, I decided to use English names to avoid the ugly mix of English and German

More information under 'Info' in the game's menu

If you are experiencing performance issues or want the terrain to look nicer, you can adjust the quality variables in the main sketch file.

If you want to try it out, you can find it on GitHub or just directly download it

If you'd prefer that, I also copied all the code in a single file: GitHub Gist

Here are some images:

Base Profile 05.14.2017 - 17.20.02.08 (2)

Base Profile 05.14.2017 - 17.22.09.09 (2)

Base Profile 05.14.2017 - 17.35.16.15

Base Profile 05.14.2017 - 17.35.05.13

Base Profile 05.14.2017 - 19.32.52.19

Sadly, I didn't have enough time for designing models for enemies or towers before I had to hand in the finished program, so they're all just spheres.

Enjoy!


Kinect for Windows V2 Library for Processing

$
0
0

Hey.

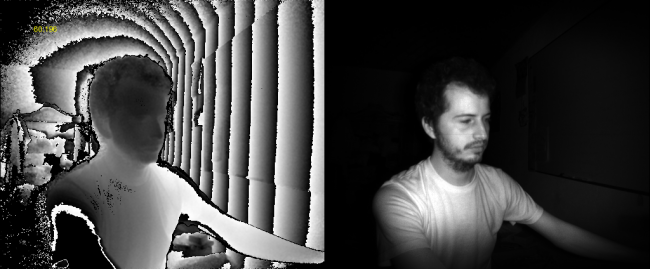
I just started to developing a Kinect One library for processing. The version uses the Kinect one SDK beta (K2W2), so it only works for windows ): .

You can get the current version is still beta.

https://github.com/ThomasLengeling/KinectPV2

screen-1852

I have only tested on my machine, so please send me your comments and suggestions.

It currently only support color image capture, depth and infrared capture. In the coming weeks I'll be adding features like skeleton tracking, points cloud, user tracking. Also the K2W2 is still on beta form, so I will be updating the library in the next couple of weeks.

Thomas

JPG quality when saving out...

$
0
0

I was wondering if this will ever be put in processing. A way to set the quality level on saving jpeg...

I spent an hour or two looking up how to do this. (change the strings if you need) I haven't looked into taking a PImage and well turning it into a BufferedImage This just reads a jpg then saves it out at a different quality

Oh you'll need the following imports

    import javax.imageio.ImageIO;
    import java.awt.image.BufferedImage;
    import java.util.Iterator;
    import javax.imageio.ImageWriter;
    import javax.imageio.ImageWriteParam;
    import javax.imageio.IIOImage;
    //(this can probably simplified to import javax.imageio.*; )

    void saveJpg(float qual)
    {
        // mostly from
        // stackoverflow.com/questions/17108234/setting-jpg-compression-level-with-imageio-in-java
        try{
          File testimage = new File("R:\\john2017.jpg");

          BufferedImage bufimg = ImageIO.read(testimage);
          File outfile = new File("R:\\john2017.jpg");
          Iterator<ImageWriter> iter = ImageIO.getImageWritersByFormatName("jpeg");
          ImageWriter writer = iter.next();
          ImageWriteParam iwp = writer.getDefaultWriteParam();
          iwp.setCompressionMode(ImageWriteParam.MODE_EXPLICIT);
          // iwp.setCompressionQuality(0.1f);
          iwp.setCompressionQuality(qual);
          // writer.setOutput(outfile);
          writer.setOutput(ImageIO.createImageOutputStream(outfile));
          writer.write(null, new IIOImage(bufimg, null, null), iwp);
          writer.dispose();
        } catch (IOException ex) {
          System.out.println("Exception : " + ex);
        }
    }

Seven Segment Function

$
0
0

It's a auto detect seven segment number display function, hope that someone may need it :)


void setup(){

size(1000,1000);

 background(0);
}

void draw(){
  background(0);

LED_NUMBER(25,200,200,50);  // Number(INT) ,X position, Y position , Size

}


void LED_NUMBER(int score ,float x ,float y,float w){
int n = str(score).length();
float d = w/2.5;
for (int i =1;i=n;i++){   //add "bigger" at i=n

int now =int(str(score).substring(-1+i,i));
int off = 0;
int on  = #F00F0F;
int state_a =off,state_b =off,state_c =off,state_d =off,state_e =off,state_f =off,state_g =off;
x=i*w*2.8; //distance

strokeWeight(w/2);

switch(now) {
  case 0:
     state_a =on;state_b =on;state_c =on;state_d =on;state_e =on;state_f =on;state_g =off;
    break;
  case 1:
     state_a =off;state_b =on;state_c =on;state_d =off;state_e =off;state_f =off;state_g =off;
    break;
  case 2:
    state_a =on;state_b =on;state_c =off;state_d =on;state_e =on;state_f =off;state_g =on;
    break;
  case 3:
   state_a =on;state_b =on;state_c =on;state_d =on;state_e =off;state_f =off;state_g =on;
    break;
  case 4:
    state_a =off;state_b =on;state_c =on;state_d =off;state_e =off;state_f =on;state_g =on;
    break;
  case 5:
    state_a =on;state_b =off;state_c =on;state_d =on;state_e =off;state_f =on;state_g =on;
    break;
  case 6:
    state_a =on;state_b =off;state_c =on;state_d =on;state_e =on;state_f =on;state_g =on;
    break;
  case 7:
    state_a =on;state_b =on;state_c =on;state_d =off;state_e =off;state_f =off;state_g =off;
    break;
  case 8:
    state_a =on;state_b =on;state_c =on;state_d =on;state_e =on;state_f =on;state_g =on;
    break;
  case 9:
    state_a =on;state_b =on;state_c =on;state_d =on;state_e =off;state_f =on;state_g =on;
    break;
  default:
     state_a =off;state_b =off;state_c =off;state_d =off;state_e =off;state_f =off;state_g =off;
    break;
}

stroke(state_a);
line(x  ,y  ,x+w,y  );  //a
stroke(state_b);
line(x+w+d,y+d  ,x+w+d,y+w+d);  //b
stroke(state_c);
line(x+w+d,y+w+d*3  ,x+w+d,y+w*2+d*3);  //c
stroke(state_e);
line(x-d,y+w+d*3  ,x-d,y+w*2+d*3);  //e
stroke(state_f);
line(x-d,y+d  ,x-d,y+w+d);  //f
stroke(state_g);
line(x  ,y+w+d*2  ,x+w,y+w+d*2  );  //g
stroke(state_d);
line(x  ,y+w*3+d*1.5  ,x+w,y+w*3+d*1.5  );  //d
}
}


9487

Ripples shader demo

Rigid Body Simulation

Trying to figure out Box2D.

$
0
0

Ok, so I have been trying to figure out Box2D by reading The Nature of Code by Daniel Shiffman. But I didn't manage to get my code to run because Shiffman jumps over a few vital steps. I tried to find a solution on this forum, but I only found others with the same problem. So I when I finally understood it, I opened a github repository and wrote my own little tutorial on how to get started with Box2D.

And why not share it with you guys? I hope it can be of help for anyone struggeling to understand Box2D. And if you do read it, would you give me some feedback? Did I get something wrong? Am I missing something important?

Here it is: eeyorelife.github.io

Convert mp4 to mp3 + calling command line programs from Processing

$
0
0

Hi! I was asked how to get the audio out of a video file, so I shared this little program:

https://github.com/hamoid/Fun-Programming/blob/master/processing/ideas/2017/05/extractAudioWithFfmpeg/extractAudioWithFfmpeg.pde

It also serves as an example of calling any command line program. There's thousands of command line programs to do all kinds of audio, video and image manipulation. It's like a massive Processing library :) A bit geeky, but powerful.

Some media related command line tools:

What other tools should be in this list?


Select COM port in sketch through drop down list using controlP5 and serial library

$
0
0

So i made this simple sketch where you can easily select the serial port in a drop down meny. I used the Serial and controlp5 library. Hope you like it, Enjoy!

import processing.serial.*;
import controlP5.*;

ControlP5 cp5;
DropdownList d1;

Serial myPort;

String portName;
int serialListIndex;

void setup() {
  clear();
  size(700, 400 );
  cp5 = new ControlP5(this);

  PFont pfont = createFont("Arial",10,true); //Create a font
  ControlFont font = new ControlFont(pfont,20); //font, font-size

  d1 = cp5.addDropdownList("myList-d1")
          .setPosition(100, 100)
          .setSize(100, 200)
          .setHeight(210)
          .setItemHeight(40)
          .setBarHeight(50)
          .setFont(font)
          .setColorBackground(color(60))
          .setColorActive(color(255, 128))
          ;

      d1.getCaptionLabel().set("PORT"); //set PORT before anything is selected

      portName = Serial.list()[0]; //0 as default
      myPort = new Serial(this, portName, 9600);
}

void draw() {
  background(128);

  if(d1.isMouseOver()) {
   d1.clear(); //Delete all the items
   for (int i=0;i<Serial.list().length;i++) {
     d1.addItem(Serial.list()[i], i); //add the items in the list
   }
  }
  if ( myPort.available() > 0) {  //read incoming data from serial port
    println(myPort.readStringUntil('\n')); //read until new input
   }
}

void controlEvent(ControlEvent theEvent) { //when something in the list is selected
    myPort.clear(); //delete the port
    myPort.stop(); //stop the port
    if (theEvent.isController() && d1.isMouseOver()) {
    portName = Serial.list()[int(theEvent.getController().getValue())]; //port name is set to the selected port in the dropDownMeny
    myPort = new Serial(this, portName, 9600); //Create a new connection
    println("Serial index set to: " + theEvent.getController().getValue());
    delay(2000);
    }
}

Why another Instance of the class?

$
0
0

I an new to processing and java as well. I've been following some tutorials to generate a bouncy ball sketch.

            import java.util.*;

            ArrayList balti = new ArrayList();


            void setup() {
              size(600, 600);
              smooth();


              for ( int i=0; i<100; i++) {
                Aloo keshavball = new Aloo(random(0, width), random(0, 200));
                balti.add(keshavball);
              }
            }

            void draw() {
              background(0);
              for (int i=0; i<100; i++) {
                Aloo keshavball = (Aloo) balti.get(i); // I want to focus here !! What is happening here? I am really confused !
                keshavball.mainfunction();
              }
            }

and other file is:

        class Aloo {

          float x;
          float y;
          float speedX=random(-5,5);
          float speedY=random(-5,5);

          Aloo(float _x, float _y) {

            x = _x;
            y = _y;
          }

          void mainfunction() {
            display();
            move();
            bounce();
            gravity();
          }
          void display() {
            ellipse(x, y, 20, 20);
          }

          void move() {
            x += speedX;
            y += speedY;
          }

          void bounce() {
            if (x > width) {
              speedX *= -1;
            }
            if (y > height) {
              speedY *= -1;
            }
            if (x < 0) {
              speedX *= -1;
            }
            if (y < 0) {
              speedY *= -1;
            }
          }

          void gravity() {
            speedY = speedY +0.25;
          }
        }

Ant template for Processing

Flow field path finding

$
0
0

https://vimeo.com//220571608

https://github.com/lmccandless/Processing3/tree/master/pathFlowing

After getting really frustrated with(and giving up on) A* search, I reinvented something that as usual, already existed, called flow field path finding. This is a pixel based approach that detects red pixels as obstacles. I implemented it on both the CPU and the GPU. The path finders run on the CPU, only using the GPU generated path map for understanding their immediate surroundings. I get 90+ fps on the GPU version with a couple thousands entities pathing per frame.

Toggle between CPU/GPU flow field engines with (q) key.

-/+ gpu shader passes with (1/2) keys.

Toggle 60fps frame rate lock with (a) key.

A brief explanation of how flow field tech works. Imagine your house is totally blacked out, now put a very bright flashlight in one of the rooms. If the flashlight is bright enough, you should be able to find your way to the flashlight in the fastest possible route from any other room by looking at your feet and moving in the direction that is brightest.

Ant template for Processing

Getting the frame in processing 3

$
0
0

This is for myself. To avoid the next hell of java reflection and processing's private and protected pain.

import processing.awt.*;
import java.awt.Frame;
import java.lang.reflect.Field;
import processing.awt.PSurfaceAWT.SmoothCanvas;


void setup() {
  Frame frame = get_frame();
  println(frame.getLocation().x);
}


Frame get_frame() {
  Frame frame = null;
  try {
    Field f = ((PSurfaceAWT) surface).getClass().getDeclaredField("frame");
    f.setAccessible(true);
    frame  = (Frame) (f.get(((PSurfaceAWT) surface)));
  }
  catch(Exception e) {
    println(e);
  }
  return frame;
}

Fractal-Based Art Pieces

$
0
0

I've recently been somewhat interested the concept of fractals and how I can implement them in Processing, so I tried messing around with them to see what I could come up with and made a few pieces:

This one (which is my personal favorite): fractal pattern 1

This one: fractal diamonds 1

And a more interactive one at this link (the other two are on my openProcessing page as well): https://openprocessing.org/sketch/433868

I haven't gotten to the Mandelbrot, Koch curve or recursive tree (yet), but I'd like to eventually!


New Python Example for the Fisica Library

Simple Shadow Mapping

$
0
0

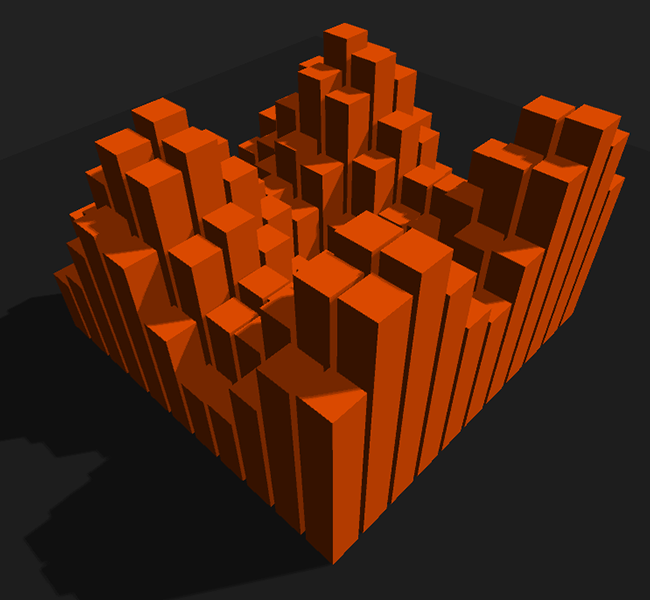
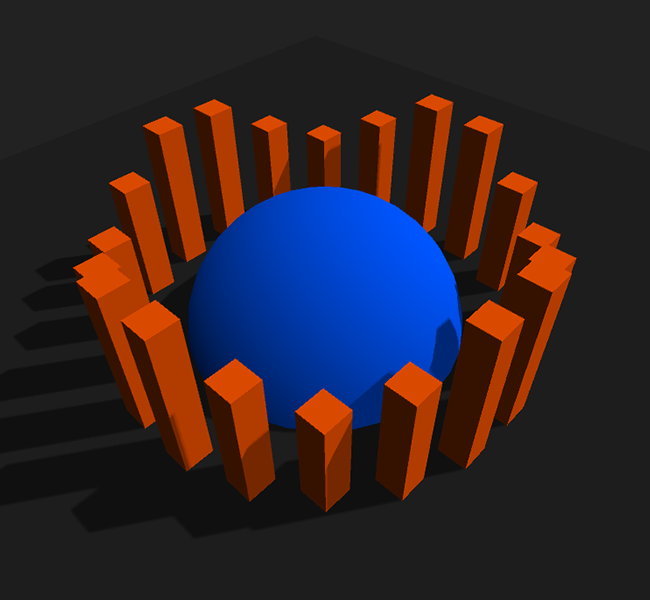
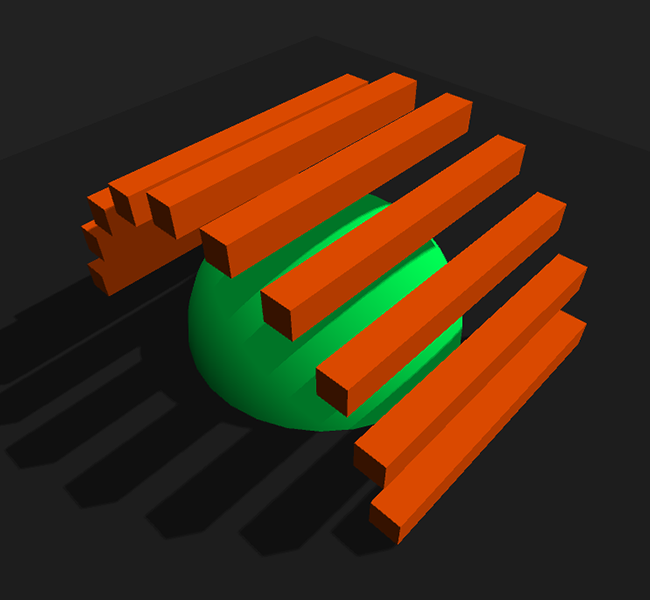
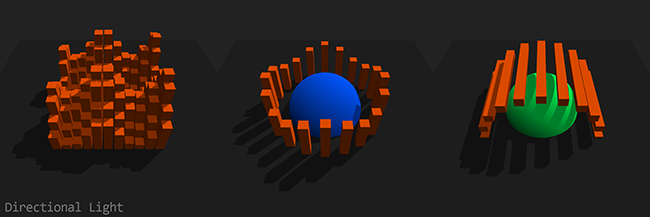
Implemented the shadow mapping technique from this old tutorial (without using any "low level GL") in Processing 3.0.X.

shadow_mapping_1 shadow_mapping_0 shadow_mapping_2 shadow-mapping-dir shadow-mapping-spot

Press 1, 2 or 3 to switch between the different demo "landscapes", s for spotlight and d for directional light.

import peasy.*;

PVector lightDir = new PVector();
PShader defaultShader;
PGraphics shadowMap;
int landscape = 1;

void setup() {
    size(800, 800, P3D);
    new PeasyCam(this, 300).rotateX(4.0);
    initShadowPass();
    initDefaultPass();
}

void draw() {

    // Calculate the light direction (actually scaled by negative distance)
    float lightAngle = frameCount * 0.002;
    lightDir.set(sin(lightAngle) * 160, 160, cos(lightAngle) * 160);

    // Render shadow pass
    shadowMap.beginDraw();
    shadowMap.camera(lightDir.x, lightDir.y, lightDir.z, 0, 0, 0, 0, 1, 0);
    shadowMap.background(0xffffffff); // Will set the depth to 1.0 (maximum depth)
    renderLandscape(shadowMap);
    shadowMap.endDraw();
    shadowMap.updatePixels();

    // Update the shadow transformation matrix and send it, the light
    // direction normal and the shadow map to the default shader.
    updateDefaultShader();

    // Render default pass
    background(0xff222222);
    renderLandscape(g);

    // Render light source
    pushMatrix();
    fill(0xffffffff);
    translate(lightDir.x, lightDir.y, lightDir.z);
    box(5);
    popMatrix();

}

public void initShadowPass() {
    shadowMap = createGraphics(2048, 2048, P3D);
    String[] vertSource = {
        "uniform mat4 transform;",

        "attribute vec4 vertex;",

        "void main() {",
            "gl_Position = transform * vertex;",
        "}"
    };
    String[] fragSource = {

        // In the default shader we won't be able to access the shadowMap's depth anymore,
        // just the color, so this function will pack the 16bit depth float into the first
        // two 8bit channels of the rgba vector.
        "vec4 packDepth(float depth) {",
            "float depthFrac = fract(depth * 255.0);",
            "return vec4(depth - depthFrac / 255.0, depthFrac, 1.0, 1.0);",
        "}",

        "void main(void) {",
            "gl_FragColor = packDepth(gl_FragCoord.z);",
        "}"
    };
    shadowMap.noSmooth(); // Antialiasing on the shadowMap leads to weird artifacts
    //shadowMap.loadPixels(); // Will interfere with noSmooth() (probably a bug in Processing)
    shadowMap.beginDraw();
    shadowMap.noStroke();
    shadowMap.shader(new PShader(this, vertSource, fragSource));
    shadowMap.ortho(-200, 200, -200, 200, 10, 400); // Setup orthogonal view matrix for the directional light
    shadowMap.endDraw();
}

public void initDefaultPass() {
    String[] vertSource = {
        "uniform mat4 transform;",
        "uniform mat4 modelview;",
        "uniform mat3 normalMatrix;",
        "uniform mat4 shadowTransform;",
        "uniform vec3 lightDirection;",

        "attribute vec4 vertex;",
        "attribute vec4 color;",
        "attribute vec3 normal;",

        "varying vec4 vertColor;",
        "varying vec4 shadowCoord;",
        "varying float lightIntensity;",

        "void main() {",
            "vertColor = color;",
            "vec4 vertPosition = modelview * vertex;", // Get vertex position in model view space
            "vec3 vertNormal = normalize(normalMatrix * normal);", // Get normal direction in model view space
            "shadowCoord = shadowTransform * (vertPosition + vec4(vertNormal, 0.0));", // Normal bias removes the shadow acne
            "lightIntensity = 0.5 + dot(-lightDirection, vertNormal) * 0.5;",
            "gl_Position = transform * vertex;",
        "}"
    };
    String[] fragSource = {
        "#version 120",

        // Used a bigger poisson disk kernel than in the tutorial to get smoother results
        "const vec2 poissonDisk[9] = vec2[] (",
            "vec2(0.95581, -0.18159), vec2(0.50147, -0.35807), vec2(0.69607, 0.35559),",
            "vec2(-0.0036825, -0.59150), vec2(0.15930, 0.089750), vec2(-0.65031, 0.058189),",
            "vec2(0.11915, 0.78449), vec2(-0.34296, 0.51575), vec2(-0.60380, -0.41527)",
        ");",

        // Unpack the 16bit depth float from the first two 8bit channels of the rgba vector
        "float unpackDepth(vec4 color) {",
            "return color.r + color.g / 255.0;",
        "}",

        "uniform sampler2D shadowMap;",

        "varying vec4 vertColor;",
        "varying vec4 shadowCoord;",
        "varying float lightIntensity;",

        "void main(void) {",

            // Project shadow coords, needed for a perspective light matrix (spotlight)
            "vec3 shadowCoordProj = shadowCoord.xyz / shadowCoord.w;",

            // Only render shadow if fragment is facing the light
            "if(lightIntensity > 0.5) {",
                "float visibility = 9.0;",

                // I used step() instead of branching, should be much faster this way
                "for(int n = 0; n < 9; ++n)",
                    "visibility += step(shadowCoordProj.z, unpackDepth(texture2D(shadowMap, shadowCoordProj.xy + poissonDisk[n] / 512.0)));",

                "gl_FragColor = vec4(vertColor.rgb * min(visibility * 0.05556, lightIntensity), vertColor.a);",
            "} else",
                "gl_FragColor = vec4(vertColor.rgb * lightIntensity, vertColor.a);",

        "}"
    };
    shader(defaultShader = new PShader(this, vertSource, fragSource));
    noStroke();
    perspective(60 * DEG_TO_RAD, (float)width / height, 10, 1000);
}

void updateDefaultShader() {

    // Bias matrix to move homogeneous shadowCoords into the UV texture space
    PMatrix3D shadowTransform = new PMatrix3D(
        0.5, 0.0, 0.0, 0.5,
        0.0, 0.5, 0.0, 0.5,
        0.0, 0.0, 0.5, 0.5,
        0.0, 0.0, 0.0, 1.0
    );

    // Apply project modelview matrix from the shadow pass (light direction)
    shadowTransform.apply(((PGraphicsOpenGL)shadowMap).projmodelview);

    // Apply the inverted modelview matrix from the default pass to get the original vertex
    // positions inside the shader. This is needed because Processing is pre-multiplying
    // the vertices by the modelview matrix (for better performance).
    PMatrix3D modelviewInv = ((PGraphicsOpenGL)g).modelviewInv;
    shadowTransform.apply(modelviewInv);

    // Convert column-minor PMatrix to column-major GLMatrix and send it to the shader.
    // PShader.set(String, PMatrix3D) doesn't convert the matrix for some reason.
    defaultShader.set("shadowTransform", new PMatrix3D(
        shadowTransform.m00, shadowTransform.m10, shadowTransform.m20, shadowTransform.m30,
        shadowTransform.m01, shadowTransform.m11, shadowTransform.m21, shadowTransform.m31,
        shadowTransform.m02, shadowTransform.m12, shadowTransform.m22, shadowTransform.m32,
        shadowTransform.m03, shadowTransform.m13, shadowTransform.m23, shadowTransform.m33
    ));

    // Calculate light direction normal, which is the transpose of the inverse of the
    // modelview matrix and send it to the default shader.
    float lightNormalX = lightDir.x * modelviewInv.m00 + lightDir.y * modelviewInv.m10 + lightDir.z * modelviewInv.m20;
    float lightNormalY = lightDir.x * modelviewInv.m01 + lightDir.y * modelviewInv.m11 + lightDir.z * modelviewInv.m21;
    float lightNormalZ = lightDir.x * modelviewInv.m02 + lightDir.y * modelviewInv.m12 + lightDir.z * modelviewInv.m22;
    float normalLength = sqrt(lightNormalX * lightNormalX + lightNormalY * lightNormalY + lightNormalZ * lightNormalZ);
    defaultShader.set("lightDirection", lightNormalX / -normalLength, lightNormalY / -normalLength, lightNormalZ / -normalLength);

    // Send the shadowmap to the default shader
    defaultShader.set("shadowMap", shadowMap);

}

public void keyPressed() {
    if(key != CODED) {
        if(key >= '1' && key <= '3')
            landscape = key - '0';
        else if(key == 'd') {
            shadowMap.beginDraw(); shadowMap.ortho(-200, 200, -200, 200, 10, 400); shadowMap.endDraw();
        } else if(key == 's') {
            shadowMap.beginDraw(); shadowMap.perspective(60 * DEG_TO_RAD, 1, 10, 1000); shadowMap.endDraw();
        }
    }
}

public void renderLandscape(PGraphics canvas) {
    switch(landscape) {
        case 1: {
            float offset = -frameCount * 0.01;
            canvas.fill(0xffff5500);
            for(int z = -5; z < 6; ++z)
                for(int x = -5; x < 6; ++x) {
                    canvas.pushMatrix();
                    canvas.translate(x * 12, sin(offset + x) * 20 + cos(offset + z) * 20, z * 12);
                    canvas.box(10, 100, 10);
                    canvas.popMatrix();
                }
        } break;
        case 2: {
            float angle = -frameCount * 0.0015, rotation = TWO_PI / 20;
            canvas.fill(0xffff5500);
            for(int n = 0; n < 20; ++n, angle += rotation) {
                canvas.pushMatrix();
                canvas.translate(sin(angle) * 70, cos(angle * 4) * 10, cos(angle) * 70);
                canvas.box(10, 100, 10);
                canvas.popMatrix();
            }
            canvas.fill(0xff0055ff);
            canvas.sphere(50);
        } break;
        case 3: {
            float angle = -frameCount * 0.0015, rotation = TWO_PI / 20;
            canvas.fill(0xffff5500);
            for(int n = 0; n < 20; ++n, angle += rotation) {
                canvas.pushMatrix();
                canvas.translate(sin(angle) * 70, cos(angle) * 70, 0);
                canvas.box(10, 10, 100);
                canvas.popMatrix();
            }
            canvas.fill(0xff00ff55);
            canvas.sphere(50);
        }
    }
    canvas.fill(0xff222222);
    canvas.box(360, 5, 360);
}

I mostly commented the Processing part of the sketch, the GLSL stuff is explained in the linked tutorial. Anyways, I hope you have fun with it. :)

Code for generating 360 Stereoscopic videos with Processing

$
0
0

Hi!

I started looking into generating 360 video with Processing at the back end of 2016 using a modification to the dome projection example sketch and an equirectangular shader. It was a neat little trick, taking a cubemap and running it through the shader to generate frames for a 360 video.

Going further down the rabbit hole I ended up putting together a sketch that generates a full top/bottom stereoscopic frame that can be used to render out a 360 video. This was based largely on the Unreal Engine plug in by Kite & Lightning, and a lot of reading of Paul Bourke's research into stereoscopy.

I've made the code public on GitHub to see what the Processing community at large makes of it https://github.com/tracerstar/processing-360-video

This is a music video I made that was generated using the code https://vimeo.com/218341125

At some point I'll do a full write up of how to use the code and add some simpler examples, as well as some tricks on how to get the best quality video from the rendered frames, but I wanted to share it and see what people can make with it.

The simple shader examples run surprisingly fast (depending on what you're drawing to the screen), but the full stereoscopic example is quite slow (1 frame per 30 seconds on a decent graphics card). It's not intended as a realtime solution, but a renderer for frames of a video.

At this point, there's no plans to make a full library with it, it's kind of an "as is" sketch, but it does the job, and the results are pretty reasonable.

Hope you enjoy it!

FFT visualization in Python Mode

$
0
0

I created this to get more familiar with FFT. Like the Fortran example at the DSP Guide, Python supports complex numbers directly.

Things to note: The forward and inverse FFT are very similar.

Pay close attention to how the sample sets ('signal' and 'wave' arrays) are displayed versus how they were created.

Included comments are my interpretation of the algorithm.

# Length of data to run through FFT
N = 256 # must be a power of 2 for FFT
M = int(log(N) / log(2)) + 1 # grab number of bit levels in N, plus one for range()

"""
Fast Fourier Transform
  Modifies data to represent the Complex Fourier Transform of the input
  Note: The inverse transform will also overwrite data passed to it

Reference: http://www.dspguide.com/ch12/3.htm
"""
def FFT( data ):
  # Sort by bit reversed index
  nd2 = N/2
  j = nd2
  k = 0
  for i in xrange( 1, N-2 ):
    if i < j:
      data[j], data[i] = data[i], data[j] # Pythonic swap
    k = nd2
    while not (k>j):
      j = j - k
      k = k / 2
    j = j + k


  # Bulk of the algorithm from here:
  # For each bit level...
  for L in xrange( 1, M ):

    # Calculate which frequencies to work on this round,
    le = 1<<L
    le2 = le / 2
    # Phase step size at this bit level, AKA: the frequency
    # A complex number
    s = cos(PI/le2) - sin(PI/le2)*1j

    # Init our complex multiplier
    u = 1+0j

    for j in xrange( 1, le2+1 ):
      jm1 = j - 1

      for i in xrange( jm1, N, le ):
        ip = i + le2 # where in data? i and ip

        # Complex multiplication
        # This is what creates constructive or destructive interference
        #   (if sample data is similar to selected frequency, they combine)
        #   (if sample data is _not_ similar to selected frequency, they cancel)
        t = data[ip] * u

        # Positive and Negative frequency bins
        # The FFT is symmetric
        data[ip] = data[i] - t
        data[i] = data[i] + t

      # With each step, rotate multiplier by the frequency step
      # Multiplying complex numbers is easier if you convert them to polar representation first
      #     In polar coordinates add lengths and angles
      #     Convert back to rectangular (complex)
      u = u * s


#
# Inverse FFT
#
def IFFT( data ):
  for i in xrange( len(data) ): # Mirror imaginary values of data
    data[i] = data[i].conjugate()

  FFT( data ); # FFT of mirrored data

  for i in xrange( len(data) ): # Mirror again and scale
    data[i] = data[i].conjugate() / N


# Init samples with complex numbers, length of N
signal = [ (0+0j) ]*N
wave = [ (0+0j) ]*N

# Build a signal in frequency domain
F = 7
signal[F] = 8j
signal[N-F] = -8j

# Create a sine wave in time domain
for i in xrange( N ):
    wave[i] = 0.5*sin( 4*(i*PI)/N )

# Arbitrary drawing size
scl = 1

def setup():
    size(512,512,P3D)
    noFill()
    FFT(signal)
    FFT(wave)
    noLoop()

def mouseDragged():
    redraw()

def draw():
    background(0)
    translate( (width/2), (height/2) )
    rotateY( (TWO_PI*mouseX) / width )
    rotateX( (TWO_PI*mouseY) / height )

    # Draw FFT of frequency domain signal in green
    x = 0
    lastx = 0
    lasty = 0
    lastz = 0
    stroke(0,255,0)
    for n in signal:
        x += 1
        y = n.real * scl
        z = n.imag * scl
        line(lastx-(N/2),lasty,lastz, x-(N/2),y,z)
        lastx = x
        lasty = y
        lastz = z

    # Draw FFT of time domain wave in blue
    x = 0
    lastx = 0
    lasty = 0
    lastz = 0
    stroke(0,0,255)
    for n in wave:
        x += 1
        y = n.real * scl
        z = n.imag * scl
        line(lastx-(N/2),lasty,lastz, x-(N/2),y,z)
        lastx = x
        lasty = y
        lastz = z

deltaFix , my solution to no deltaTime

$
0
0

I have created a, kind of simple, formula for both emulating deltaTime and creating a 'game speed'; into a single variable. As I am not the best with math, I called the variable 'deltaFix', as it was my fix to the problem and also adds more to it.

I tried looking for information on using deltaTime, but read that it was a local variable that in inaccessible. So for being able to emulate it, I took a small amount of time to create it on my own for my needs and decided to share it because it is a bit more useful than 'just' normal deltaTime.

There are 2 variables that can be 'played with' to get the game running how you want it. FPS changes the screen's frameRate, and is used for determining 'deltaFix'. GAMESPEED is how fast you want the game running at (normal is 60, fast is 120, slow is 30), and also used to determine deltaFix. previousMilli is just a spot holder for the millis(), to compare frame start to frame start. deltaDiv is used as a small float placeholder to adjust the speed slightly to account for the time difference in frames (if frame 1 took a little longer to run, then frame 2 will be slightly adjusted by that)- so that the variable will not have a sudden drop due to frame rate slowing down (it is very minor, and unnoticeable; but useful if you had a sudden lag).

First step is to set the FPS (I usually set it to 120) and GAMESPEED (I usually set it to 60); before setup. Then in setup, I define frameRate to FPS, decide the size of the screen, then provide a previousMilli starting point (this will cause frame 1 to have a larger jump than every other frame.

inside draw, at the very beginning, I do my main operations for determining deltaDiv and deltaFix. deltaDiv is simply previousMilli divided by millis(), in order to get that minor (or by chance large) time difference between frames. deltaFix is a 2 step equation. First, we determine the base multiplier to properly give the GAMESPEED based on the chosen FPS. Then we multiply that by deltaDiv to apply the frame rate difference. All that is left is to make prebiousMilli = milis(), and the calculation portion is done.

To show an example of how it can be used, I made a simple square that moves in a singular pattern constantly, and multiplied it's movements by deltaDiv. So, while the gamespeed is at 120, I can freely adjust the FPS- and it will always be at the same point in space at the same point in time- no matter the FPS.

I am more then sure this can be made more accurate and faster; and has some flaws probably (I am an amateur programmer, with barely any memory of High School math from 2 years ago). I am actually using this formula in a game engine that I am developing using Processing, because why not- plus there is no game engine available that is up to date with processing currently.

final float FPS = 120;
final float GAMESPEED = 60;

float previousMilli, deltaDiv, deltaFix;

float x = 1;
float y = 1;
void setup() {
  frameRate(FPS);
  size(640, 480, P3D);
  previousMilli = millis();
}

void draw() {
  deltaDiv = previousMilli / millis();
  deltaFix = (GAMESPEED / FPS) * deltaDiv;
  previousMilli = millis();
  background(0, 0, 0);
  x += 1 * deltaFix;
  y += 1 * deltaFix;
  rect(x, y, 25, 25);
  if (x > 665) {
    x = 0;
  }
  if (y > 505) {
    y = 0;
  }
}
Viewing all 428 articles
Browse latest View live