If you are looking for a more elaborate gauge, like a professional Gauge here's an example I built based on PNG images in Processing. I hope it helps.

Somebody tell me, how I can leave the "ZIP" file with the sketch and images, on this message?
If you are looking for a more elaborate gauge, like a professional Gauge here's an example I built based on PNG images in Processing. I hope it helps.
Somebody tell me, how I can leave the "ZIP" file with the sketch and images, on this message?
Hi guys,
I've been working on a game for some time and I would like to have some feedback. Also I want to make sure I have eliminated almost all bugs.
How to install:
I haven't quite figured out how to have the jar file automatically extract files but all you have to do is open the jar file (with winrar etc), go to vansius and copy the alchemy folder and put it in your "Documents" folder (C:/Users/YourName/Documents/alchemy). If you have a suggestion on how I would implement this extraction that will be great. Then just double click the jar and the game should launch.
How to play:
Click new game to begin. On the left of your screen are groups, they contain elements. Open two groups by clicking them ( you can open the same group twice). Then click on two elements to combine them. If the combination works, then a new element will be created! If it doesn't , then the selection box will turn red. Don't forget to click the save button to save! (The rest of the game is pretty self explanatory)
TL;DR download my game and test it out thanks also idk how to make the jar extract files via code
I don't know if this is the simplest form of associative memory ever but there ain't much to it. Almost nothing in fact! https://discourse.numenta.org/t/independent-value-storage-by-binarization/2384/9
AssociativeMemory am=new AssociativeMemory(512,15,1234567);
float[][] examples=new float[4][512];
float[] x=new float[512];

void setup() {
  size(512, 440);
  background(0);
  frameRate(4);
  for(int i=0;i<512;i++){
    examples[0][i]=50f*sin(0.1f*i);
    examples[1][i]=50f*cos(0.3f*i);
    examples[2][i]=10f*(i%11)-50;
    examples[3][i]=0.0003f*i*i-50;
  }
}

void draw() {
  clear();
  for(int i=0;i<4;i++){
    am.recallVec(x,examples[(i-1)&3]);
    for(int j=0;j<512;j++){
      set(j,60+i*110+(int)x[j],color(255));
    }
  }
  for(int i=0;i<4;i++){
    am.trainVec(examples[(i+1)&3],examples[i]);
  }
}

class AssociativeMemory {

  int vecLen;
  int density;
  int hash;
  float[][] weights;
  float[][] bipolar;
  float[] workA;
  float[] workB;
// vecLen must be 2,4,8,16,32.....
  AssociativeMemory(int vecLen, int density, int hash) {
    this.vecLen=vecLen;
    this.density=density;
    this.hash=hash;
    weights=new float[density][vecLen];
    bipolar=new float[density][vecLen];
    workA=new float[vecLen];
    workB=new float[vecLen];
  }

  void trainVec(float[] targetVec, float[] inVec) {
    float rate=1f/density;
    recallVec(workB, inVec);
    for(int i=0;i<vecLen;i++){
      workB[i]=targetVec[i]-workB[i];
    }
    for (int i=0; i<density; i++) {
      for (int j=0; j<vecLen; j++) {
        weights[i][j]+=workB[j]*bipolar[i][j]*rate;
      }
    }
  }

  void recallVec(float[] resultVec, float[] inVec) {
    System.arraycopy(inVec, 0, workA, 0, vecLen);
    java.util.Arrays.fill(resultVec, 0f);
    for (int i=0; i<density; i++) {
      signFlip(workA, hash+i);
      wht(workA);
      signOf(bipolar[i], workA);
      for (int j=0; j<vecLen; j++) {
        resultVec[j]+=weights[i][j]*bipolar[i][j];
      }
    }
  }

  // Walsh Hadamard Transform  vec.length must be (2,4,8,16,32.....)
  void wht(float[] vec) {
    int i, j, hs=1, n=vec.length;
    float a, b, scale=1f/sqrt(n);
    while (hs<n) {
      i=0;
      while (i<n) {
        j=i+hs;
        while (i<j) {
          a=vec[i];
          b=vec[i+hs];
          vec[i]=a+b;
          vec[i+hs]=a-b;
          i+=1;
        }
        i+=hs;
      }
      hs+=hs;
    }
    for ( i=0; i<n; i++) {
      vec[i]*=scale;
    }
  }

  // recomputable random sign flip of the elements of vec
  void signFlip(float[] vec, int h) {
    for (int i=0; i<vec.length; i++) {
      h*=0x9E3779B9;
      h+=0x6A09E667;
      // Faster than -  if(h<0) vec[i]=-vec[i];
      vec[i]=Float.intBitsToFloat((h&0x80000000)^Float.floatToRawIntBits(vec[i]));
    }
  }

  // converts each element of vec to +1 or -1 according to their sign.
  void signOf(float[] biVec, float[] vec ) {
    int one=Float.floatToRawIntBits(1f);
    for (int i=0; i<biVec.length; i++) {
      biVec[i]=Float.intBitsToFloat(one|(Float.floatToRawIntBits(vec[i])&0x80000000));
    }
  }
}
YouTube demo. Draw3D was inspired by Google’s Tilt Brush app, which lets you paint in a 3D space. My goal was to create a simpler version that would let users design immersive virtual environments with just a smartphone and a Google Cardboard viewer. Draw3D allows you to “draw” in 3D by placing cubes of various sizes and colors.
I'm happy to answer any questions and would appreciate feedback!
For the people interesting by Jos Stam's work on the stable fluids, usually you find easily the solution for the 2D implementation, it's harder for the 3D part, so I solve it :) 3D/2D stables fluid solver
You can try out this simple optimization algorithm if you like:
// Continuous Gray code optimization
//http://citeseerx.ist.psu.edu/viewdoc/download;jsessionid=14BEBFED079E983F49AD75C3CA4AFF82?doi=10.1.1.100.6090&rep=rep1&type=pdf
// The most simple way to evolve solutions to engineering or other problems.
// And effective too.
void setup() {
  int iterations=100000;
  int precision=1000;
  int vecLen=50;
  float range=5.12f;

  float[] parent=new float[vecLen];
  float[] child=new float[vecLen];
  for (int i=0; i<parent.length; i++) {
    parent[i]=random(-range, range);  // random from -5.12 to 5.12
  }
  float parentCost=deYong(parent);
  for (int i=0; i<iterations; i++) {
    for (int j=0; j<parent.length; j++) {
      float mutation=exp(-precision*random(0f, 1f));
        if (random(-1f, 1f)<0) {
        mutation=-mutation;
      }
      mutation*=2*range;
      float c=parent[j]+mutation;
      if (c>range) c=parent[j];
      if (c<-range) c=parent[j];
      child[j]=c;
    }
    float childCost=deYong(child);
    if (childCost<parentCost) {
      parentCost=childCost;
      for (int j=0; j<parent.length; j++) {
        parent[j]=child[j];
      }
    }
  }
  println("Parent Cost:"+parentCost);
  for(int i=0;i<parent.length;i++){
    println("Vector: "+parent[i]);
  }
}

float deYong(float[] x){
  float result=0f;
  for(int i=0;i<x.length;i++){
    result+=x[i]*x[i];
  }
  return result;
}
I'm sure someone who knows more about json can write this code better: (Also I haven't checked this code too well!!!)
// qrng.anu.edu.au

QRND qrnd=new QRND();

void setup() {
  noLoop();
  for (int i=0; i<1024; i++){
    int r=qrnd.nextInt();
    println(r);
    println(hex(r));
    println(binary(r));
  }
}

class QRND {
  int pos;
  int[] rData=new int[512];

  int nextInt() {
    if (pos==0) {
      JSONObject json=loadJSONObject("https://" + "qrng.anu.edu.au/API/jsonI.php?length=1024&type=uint16");
      String[] tok=splitTokens(json.toString(), "[,");
      for (int i=0; i<512; i++) {
        rData[i]=(int(trim(tok[i*2+1]))<<16) | int(trim(tok[i*2+2]));
      }
    }
    int r=rData[pos];
    pos=(pos+1) & 511;
    return r;
  }
}
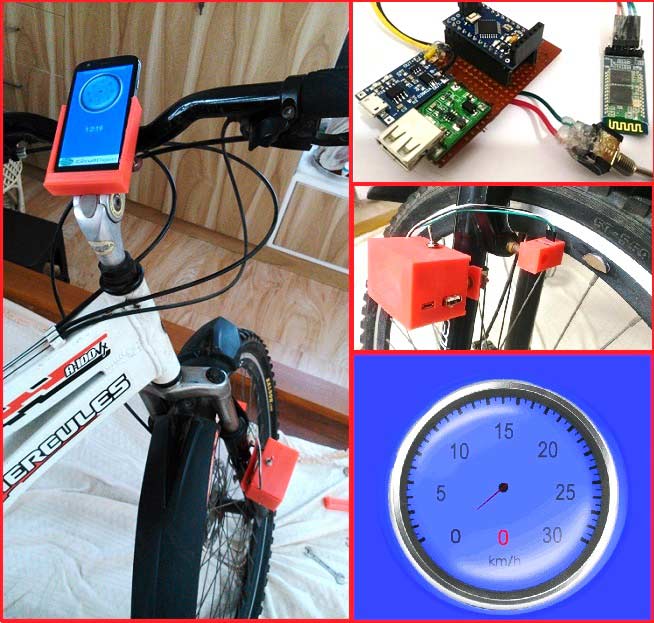
In this project we make a Cool Speedometer for bikes or any automotives by using Arduino which broadcast the speed using Bluetooth to an Android application that we created using Processing. The complete project is powered by an 18650 Lithium cell and hence highly portable along with your vehicle. To spice it up a bit more I have added the option of charging your mobile phone as it displays your speed. Yes, you can also use this as a power bank for your mobiles on the go as the 18650 has high charge density and can easily be charged and discharged.
I will completely guide you from scratch till the completion, speedometer can he hooked up to our vehicle and tested. The cool feature here is that you can customize your android app for your personalisation and add more features according to your creativity. But, if you do not want to build the app by yourself and just build the Arduino part then no worries, just download the APK file (read further) and install in your Android mobile phone. Also check the full Video at the end.
More details with code and video: https://circuitdigest.com/microcontroller-projects/diy-speedometer-using-arduino-and-processing-android-app
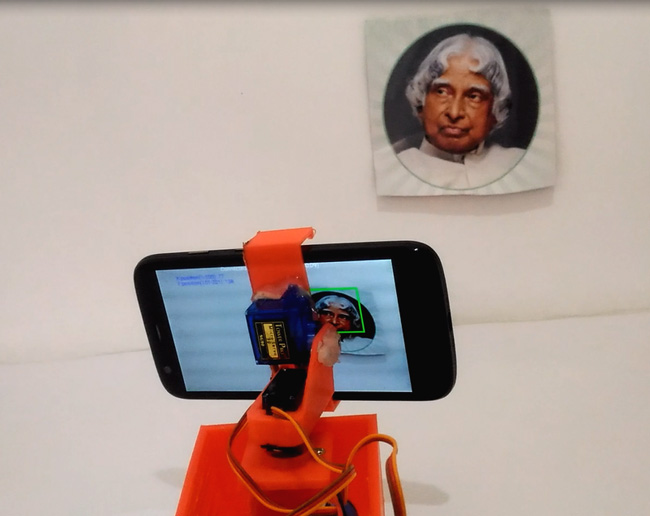
Ever wanted to build a Face Tracking Robotic Arm or Robot by simply using Arduino and not any other programming like OpenCV, visual basics C# etc? Then read along, in this project we are going to implement face detection by blending in the power of Arduino and Android. In this project, the mobile camera will move along with your face with the help of servos. The advantage of using the Android Mobile Phone here is that you do not need to invest on a camera module and the whole image detection work can be done in the phone itself, you do not need your Arduino connected to your computer for this to work. Here we have used Bluetooth Module with Arduino to communicate with Mobile wirelessly.
More details with code and video: https://circuitdigest.com/microcontroller-projects/arduino-face-tracking-robot
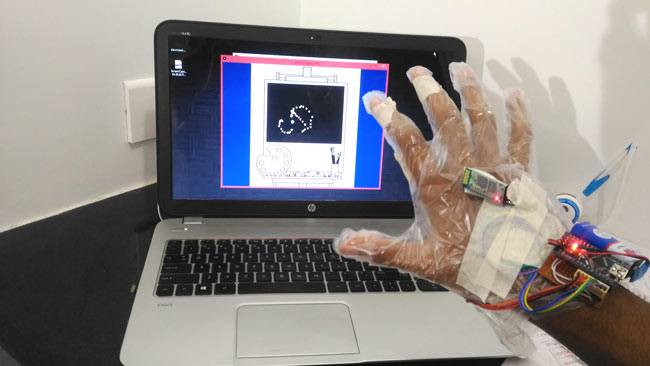 This is a very interesting project in which we implement virtual reality using Arduino and Processing. For most of us, the movie Iron man by Jon Favreau has always been an inspiration to build new things that will make our life easy and more fun. I have personally admired the Techs that are shown in the movie and have always wanted to build something similar to that. So, in this project I have tried to mimic the Virtual reality stuffs that happen in the movie, like we can simply wave our hand in front of the computer and move the pointer to the desired location and perform some tasks.
Complete details with code and video: https://circuitdigest.com/microcontroller-projects/virtual-reality-using-arduino
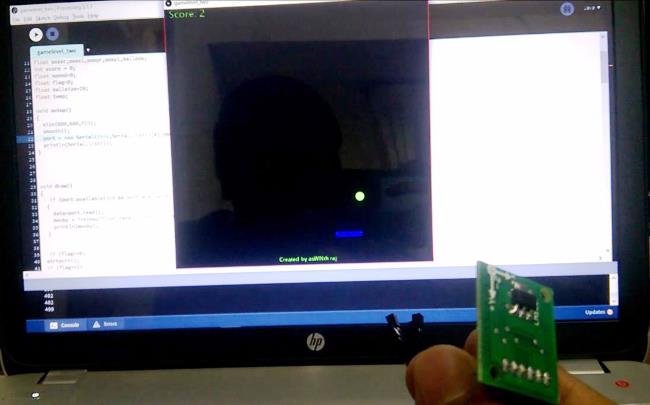
Augmented Reality and Virtual Gaming has become a recent trend in the gaming industry. The times of using a keyboard/Joystick and a mouse to play a computer game has gone behind. Now every gaming console comes with a Virtual Controller that helps us to play the game using our body movements and gestures, this way the gaming experience has increased a lot and user feels more involved into the game. In this project let's try to have fun as we learn through the project. Let us create a game (Yes you heard me correct we are goanna create a game) and play it using your hand’s movement. We are creating the classic Ping Pong Ball Game using Arduino and Accelerometer.
More details with code and video : https://circuitdigest.com/microcontroller-projects/ping-pong-game-using-arduino-accelerometer
Hi there
Here is a little web-app sort of tool I did to help me with the constant timezone / hours conversion you do on the internet. http://rich.gg/fuzo
I take the opportunity of the forum to share some technical things with you.
First, in P5.js I didn't find the "2D Picking" tool you need to "touch" a object in a 3D scene. (You know, that thing that makes the travel of the perspective in reverse to figure out which 3D object is "under" the cursor that stands on the 2D surface of the screen). So, considering I wanted to move a sphere and some points on that sphere using the mouse, I took it as a fun challenge: Make my interactions on a circle "map" to the objects on sphere. ...people should worship trigonometry
Then came the realization that my initial idea of placing the dots on the countries or cities to have the timezone set would not work on the scale of a sort of widget. I didn't want to make a zoomable globe because 1) I wanted it to be a sort of "object" that fit entirely in its screen and 2) I wanted it to be very light texture wise and 3) Didn't want to have the globe rotate on more than one axis (the proper one) So, I though may be my week of trigonometry had been for nothing and my idea was worthless. But then, I came up with the idea that I could still use my "dots-on-the-sphere-control" thing to set the timezone horizontally while using the vertical movement could be used to set the time. (this question of what sort of interaction I would use for time setting was still in the air at that moment) Of course I realized that it would result in some sort of awkward concept that users would have difficulties understanding. They will try, first thing, to put the dot on the places rather than A) Set the timezone horizontally and B) set the hour But I sort of liked it anyway and it made me think of some tools I like very much and which require a little know-how like some watch complications, a Vernier caliper etc... And I though I could make a very ultra simple sort of that ... and still be the simplest way to sort those timezone conversion thing that I know of
Once I got the tool done, it took me about the same amount of time to "package" it, meaning the DOM / html things, the "share" buttons, the god damned _responsive _ layout etc... to try to make it feel nice
On the topic of improvements, I'm thinking of adding a "now" button to make it show the current hour. Other this is I already implemented a list of the timezone cities windows offers you in its clock app (you can see them by hitting the space-bar ) and I could add a search box with suggest to have those cities show up on the globe... but hey, I can't spend too much time on this
One thing feels a bit frustrating after that : no mobile :( It shows OK on my Android devices but the interaction doesn't work at all and the frame-rate is miserable
On the frustrating topic, it seems the rendering of textures using alpha show some sort of white lining around the textures parts, which looks very bad, when you run Fuzo on a mac using an AMD GPU... if you can confirm...
So here you are you can give it a try and your feedback will be welcome thank you for reading :) rich
Hi everyone, i'd like to share with you the project i'm working on. First of all i want to give credit to Daniel Shiffman form "the coding train", i started learning Processing just a month ago, and i heavily relied on his amazing work.
This is an ecosystem simulation in which creatures can evolve from generation to generation based on their previous performances. There are 2 main classes of creatures, herbivores (Bloops = black/pink circles) and carnivores (Predators = brown/red triangles). Each species implements steering behavior such as seek and flee based on their own senses.
they carry a dna that initialize their stats like hearing range, max health, and so on. When two creatures mate, the dna is taken from the parents and mixed to generate a child that will carry his parents genes. To avoid evolution to strive just for maximizing stats, every value is inversely proportional to another one (eg. hearing is initialized by gene[0], smell is equal to the maximum possible hearing value - hearing, so if you have incredibly developed hears, you'll end up with almost no sense of smell and vice versa). That way evolution will have to find a good balance between stats over time. After reaching the mating age, every creature can emit hormones to attract possible partners. if the ecosystem collapse (less than 2 creatures left per species) it resets, evaluate every creatures based on age and child number, randomly choose among creatures (higher evaluation = higher chance of being chosen), cross their genes, and generates a new ecosystem populated with the newborn children.
I tried to comment the code as much as possible to make it readable. This is unfinished but still fun to watch. Right click to show/hide the thinking process of the creatures. Click on a creature to show/hide its senses.
World world;

boolean thinkingProcess = true;
int generations;
int lifetime;
int numF;
int numB;
int numP;
float mutationRate;
float bestBloop;
float bestPredator;
int longestGeneration;
int bloopScore;
int predatorScore;

void setup() {
  fullScreen();
  numF = 200;                                         // initialize food count
  numB = 50;                                          // initialize bloops population
  numP = 30;                                          // initialize predators population
  mutationRate = 0.01;                                // set mutationRate
  bestBloop = 0;
  bestPredator = 0;
  lifetime = 0;
  generations = 0;
  longestGeneration = 0;
  bloopScore = 0;
  predatorScore = 0;
  world = new World(numF, numB, numP);
}

void draw() {
  background(255);

  // run simulation until there are at least 2 predators and 2 bloops (if one of the species goes up to 200+ units, something went wrong, so reset ecosystem)
  if ((world.predators.size() > 1) && (world.bloops.size() > 1) && (world.predators.size() < 200) && (world.bloops.size() < 200)) {
    world.run();
    lifetime++;
  } else {
    if (world.bloops.size() > world.predators.size()) {     // check which species survived
      bloopScore += 1;
    } else {
      predatorScore += 1;
    }


    for (int i = world.bloops.size()-1; i >= 0; i--) {      // check for surviving bloops
      Bloop b = world.bloops.get(i);
      b.age += b.health;                                    // reward them by adding exceeding health to fitness
      world.bloopsClones.add(b);                            // move them to the clones arraylist
      world.bloops.remove(i);                               // remove them from bloop arraylist
    }
    for (int i = world.predators.size()-1; i >= 0; i--) {   // do the same for predators
      Predator p = world.predators.get(i);
      p.age += p.health;
      world.predatorsClones.add(p);
      world.predators.remove(i);
    }

    if (lifetime > longestGeneration) longestGeneration = lifetime;

    lifetime = 0;                                                        // create new generation
    generations++;

    world.pFoods.clear();
    world.foods.clear();                                                 //clear old food array
    for (int i=0; i < numF; i++) {
      world.foods.add(new Food(random(0, width), random(0, height)));    //initialize food for the next gen
    }

    world.getBloopsMaxFitness();                                         // calculate bloops fitness
    if (world.getBloopsMaxFitness() > bestBloop) {
      bestBloop = world.getBloopsMaxFitness();
    }
    world.bloopSelection();                                              // select bloops
    world.bloopReproduction();                                           // reproduce bloops

    world.getPredatorsMaxFitness();                                      // calculate predators fitness
    if (world.getPredatorsMaxFitness() > bestPredator) {
      bestPredator = world.getPredatorsMaxFitness();
    }
    world.predatorSelection();                                           // select predators
    world.predatorsReproduction();                                       // reproduce predators
  }

  fill(0);                                                               // display some stats
  textSize(12);
  text("Generation #: " + (generations), 10, 18);
  text("Lifetime: " + (lifetime), 10, 36);
  text("Living Bloops: " + world.bloops.size(), 10, 54);
  text("Living Predators: " + world.predators.size(), 10, 72);
  text("Oldest Bloop: " + bestBloop, 10, 90);
  text("Oldest Predator: " + bestPredator, 10, 108);
  text("Longest generation: " + longestGeneration, 10, 126);
  text("Bloop score: " + bloopScore, 10, 144);
  text("Predator score: " + predatorScore, 10, 162);
  text("Click on a creature to display senses", width-250, height-33);
  text("Right click to toggle thinking process", width-250, height-15);
}


void mousePressed() {                                     // show/hide creatures thinking process
  if (mouseButton == RIGHT) {
    thinkingProcess = !thinkingProcess;
  }


  if (mouseButton == LEFT) {
    for (int i = 0; i < world.bloops.size(); i++) {       // show/hide creature senses when you click on it (red circle = hearing, green = smell)
      world.bloops.get(i);
      if (mouseX >  world.bloops.get(i).position.x - world.bloops.get(i).r*2 && mouseX < world.bloops.get(i).position.x + world.bloops.get(i).r*2 && mouseY > world.bloops.get(i).position.y - world.bloops.get(i).r*2 && mouseY < world.bloops.get(i).position.y + world.bloops.get(i).r*2) {
        world.bloops.get(i).showSenses = !world.bloops.get(i).showSenses;
      }
    }
    for (int i = 0; i < world.predators.size(); i++) {
      world.predators.get(i);
      if (mouseX >  world.predators.get(i).position.x - world.predators.get(i).r*4 && mouseX < world.predators.get(i).position.x + world.predators.get(i).r*4 && mouseY > world.predators.get(i).position.y - world.predators.get(i).r*4 && mouseY < world.predators.get(i).position.y + world.predators.get(i).r*4) {
        world.predators.get(i).showSenses = !world.predators.get(i).showSenses;
      }
    }
  }
}
Hello. I've in the past wanted a simple trackbar to get values from so I can easily change values for testing while running the program. Yesterday I had a dream about using one to change the frequency of a sin wave and it looked really cool so I worked on one for a few hours :P Hope it can be useful maybe at some time. If other people want to improve it since it is pretty fragile feel free to :
/**
   Author : Dinoswarleafs (twitter.com/Dinoswarleafs)
   Simple input on a slider like a TrackBar on Visual Studio

   Parameters/Constructor :
   TrackBar(a, b, c, d, e, f)

   a = x-coordinate of bar
   b = y-coordinate of bar
   c = length of bar
   d = value of first tick
   e = value of last tick
   f = value between ticks (1 = 1, 2, 3, 4 | 2 = 1, 3, 5, 7 ...)

   Draw Loop :
   (name).update();
   (name).display();

   Get Slider's Value :
   (name).selectedValue (is float)

   Other customizations :
   There are a few things I just put in since they seemed too trivial to put in the constructor

   Change circle selector size    - cSize = new PVector(x, y)
   Change height of ticks         - tickHeight = y
   Change colors (display())      - fill(color)
   Text on ticks (display())      - uncomment text(...) in for loop
   Text on side ticks (display()) - uncomment 2 text(...) lines after foor loop


   To Do:
    - Exemption Handling
    - Scaling/Resizing
    - Prettier Bar?
*/

class TrackBar {

  ArrayList<PVector> indexes = new ArrayList<PVector>();
  PVector startPos, endPos, sideValues, sCircle, cSize;
  float increment, range, indexRange, gapLength, tickHeight, selectedValue;
  boolean isActivated;

  TrackBar(float startX, float startY, float xLength, float startValue, float endValue, float increment_) {
    startPos       = new PVector(startX, startY);
    endPos         = new PVector(startX + xLength, startY);
    sideValues     = new PVector(startValue, endValue);
    sCircle        = new PVector(startX, startY);
    cSize          = new PVector(20, 20);
    increment      = increment_;
    range          = endPos.x - startPos.x;
    if (sideValues.x == 0 || sideValues.y == 0)
     indexRange    = (abs(sideValues.x - sideValues.y) + 1) / increment;
    else
     indexRange    = abs(sideValues.x - sideValues.y) / increment;
    gapLength      = range / indexRange;
    tickHeight     = 20;
    selectedValue  = sideValues.x;

    float value = sideValues.x;
    float i = startPos.x;
    for (; i < endPos.x; i += gapLength) {
     indexes.add(new PVector(value, i));
     value += increment;
    }
    indexes.add(new PVector(sideValues.y, i));
  }

  void update() {
   int closestIndex = closestIndex();
   selectedValue = indexes.get(closestIndex).x;
   if (mousePressed && clickedCircle())
    isActivated = true;
   if (isActivated && mousePressed)
    //if (startPos.x < mouseX && mouseX < endPos.x)
     sCircle.x = mouseX;
   else {
    isActivated = false;
    sCircle.x = indexes.get(closestIndex).y;
   }
  }

  void display() {
    stroke(200);
    strokeWeight(2);
    fill(255);
    line(startPos.x, startPos.y, endPos.x, endPos.y);
    textAlign(CENTER);
    for (int i = 0; i < indexes.size(); i++) {
     line(indexes.get(i).y, startPos.y + tickHeight, indexes.get(i).y, startPos.y - tickHeight);
     //text((int) indexes.get(i).x, indexes.get(i).y, startPos.y + (tickHeight * 2));
    }
    text((int) indexes.get(0).x, indexes.get(0).y, startPos.y + (tickHeight * 2));
    text((int) indexes.get(indexes.size() - 1).x, indexes.get(indexes.size() - 1).y, startPos.y + (tickHeight * 2));
    fill(255);
    noStroke();
    ellipse(sCircle.x, sCircle.y, cSize.x, cSize.y);
  }


  boolean overButton() {
   // Checks if the mouse is within the circle
   // Source : https://processing.org/examples/button.html
   float disX = sCircle.x - mouseX;
   float disY = sCircle.y - mouseY;
   return (sqrt(sq(disX) + sq(disY))) < cSize.x/2;
  }

  boolean clickedCircle() {
   return overButton() && mousePressed;
  }

  int closestIndex() {
   for (int i = 0; i < indexes.size(); i++)
    if (sCircle.x < startPos.x)
     return 0;
    else if (sCircle.x > endPos.x)
     return indexes.size() - 1;
    else if (abs(sCircle.x - indexes.get(i).y) < gapLength / 2) {
     return i;
    }
    println("No closest index! This shouldn't be possible unless you modified & broke the code.");
    return -1;
  }
}
It's in my tool repo along with my button class if you want to use that (I didn't comment that one at all: https://github.com/Dinoswarleafs/DinoTools/tree/master/Tools
Hi everybody. Here is some code that helps you show a very simple FFT analysis on an analog oscilloscope, a bit silly, but I like it :-)
Connect a cable to your sound input, and your sound output to an oscilloscope. It's far from perfect, and based heavily on other examples.
It uses the awesome new XYscope library, which is available here
import ddf.minim.analysis.*;
import ddf.minim.*;
import ddf.minim.signals.*;
import xyscope.*;
XYscope xy;

Minim minim;
AudioInput in;
FFT fft;

//utilities
float teller=0;

//values for Guitar

float[] myRGBuffer;//Right - Guitar
int bands = 512;// Define how many FFT bands we want
float[] sum = new float[bands];// Create a smoothing vector
float smooth_factor = 0.7; // Create a smoothing factor
float[] fftSmooth;
float guitarGain = 20; //to change gain input in software
int specSize;
int cols=32;//number of frequency bands to display
int rows=5;//'memory' depth
int scl = 100; //distance between z-points
float dampening=0.5;
float[][] terrain;


void setup()
{
  size(512, 512, P3D);
  background(0);
  minim = new Minim(this);
  in = minim.getLineIn(Minim.STEREO, 2048);
  fft = new FFT(in.bufferSize(), in.sampleRate());
  myRGBuffer = new float[in.bufferSize()];
  terrain = new float[cols][rows];
  xy = new XYscope(this, "");
  specSize = fft.specSize();
  fftSmooth = new float[specSize];
  //xy.smoothWaves(true);
}

void draw()
{

  xy.clearWaves();
  teller++;
  background(0);
  calcFFT();
  //draw code
  pushMatrix();
  translate (0, height, 0);
  rotateX(radians(175)); //amount of degrees rotation for 'camera'
  //rotateX(radians(teller)); //autorotate
  drawGuitarMatrix();
  popMatrix();
  xy.buildWaves();
  xy.drawAll();
}


void calcFFT() {
  fft.forward(in.mix);
  for (int z = rows; z >1; z--) { //looping backwards to avoid memory errors
    for (int x = cols-1; x >0; x--) {
      if (z==2) { //we never touch the first row, so it will always be on 'the ground'
        sum[x] += (fft.getBand(x) - (sum[x])) * smooth_factor;
        //sum[x] *=x;
        //if
        terrain[x][z-1] = map(sum[x]*x, 0, 100, 0, guitarGain);//sum[x]*x = exponential scaling for higher frequencies
      } else {
        terrain[x][z-1] = terrain[x][(z-2)]*dampening;//fades out previous values by dampening the values
      }
    }
  }
}


void drawGuitarMatrix() {
  pushMatrix();
  xy.beginShape();
  for (int z = 0; z < rows-1; z++) {

    if (z%2>0) { //only even rows
      for (int x = cols-1; x >-1; x--) {
        float x1 = map(x, 0, cols, 0, width);
        xy.vertex((x1), terrain[x][z+1], ((z+1)*scl));
        xy.vertex((x1), terrain[x][z], (z*scl));
      }
      //xy.vertex(width, 0, ((z+1)*scl));
      //xy.vertex(0, 0, ((z+1)*scl));

    } else { //odd rows

      for (int x = 0; x <cols; x++) {
        float x1 = map(x, 0, cols, 0, width);
        xy.vertex((x1), terrain[x][z], (z*scl));
        xy.vertex((x1), terrain[x][z+1], ((z+1)*scl));
      }
     }
  }
 //last row&column
     if(!(rows%2>0)){xy.vertex(width, 0, (rows-1));}

       xy.vertex(0, 0, 0);

  xy.endShape();
  popMatrix();
}


void stop()
{
  // always close Minim audio classes when you finish with them
  in.close();
  minim.stop();

  super.stop();
}
I love synthwave music and the retro tron-styled grids running across screens so I made this tiny program up.
In order to run this properly, you will need the Processing Sound library installed.
You find Synthwave Fun here: Synthwave Fun
/* Create Timelaps video with your web cam (on linux) this program capture .jpg files that have to be assemble with the Movie Maker tool in order to have moivie files.
dernie modif: 9 aout 2017 Version Linux Video temporel et un programme de PASCAL AUDET débuté en juin 2016 et continué en août 2017 il permet de faire a l'aide d'une simple Webcam des vidéo timelaps, il est possible d'ajuster l'intervalle entre les capture d'image et le nombre d'image enregistrer a chaque capture.
UTILISATION des fonction clavier -Barre d'espacement:........ Pour alterner entre le mode capture et le mode ajustement -Touche de 1 a 9:............Pour modifier le nombre d'image enregistré a chaque capture -Touche Fleche Haut et Bas:..Pour Augmenter et diminuer l'intervalle de temps entre les captures -Touche BackSpace:...........Pour afficher la derniere image captée. -Touche n et b:..............Pour changer la couleur du texte a l'écran
*/
    import processing.video.*;
    String CheminRepertoireFichiers="/home/user/timelaps/";//make sure to hare a directory to store the files
    int IntervalleCapture=10000;//intervalle de départ entre les captures
    int NBR_Image=2;//nombre d'image par capture
    int NRB_CaptureEffectue=0;
    int NRB_ImagesEnregistre=0;
    String debut="";
    long Timer_Intervalle;
    int numPixels;
    int[] backgroundPixels;
    Capture video;
    String DerniereImageCaptee="VIDE";
    boolean toggleDerniere=false;
    PImage img;
    boolean toggleLive=false;
    boolean showmessage=false;
    String file_name;
    String namePadding="00000";
    int seqNum=0;
    PImage derniere;

    //XXXXXXXXXXXXXXXXXXXX SETUP
    void setup() {
      size(640, 480); //640, 480
      //fullScreen();
      String[] cameras = Capture.list();
      if (cameras == null) {
        println("Failed to retrieve the list of available cameras, will try the default...");
        video= new Capture(this, 640, 480);
      }
      if (cameras.length == 0) {
        println("There are no cameras available for capture.");
        exit();
      }
      else {
        println("Available cameras:");
        printArray(cameras);
        //video=new Capture(this, width, height, cameras[0], 30);
        //video=new Capture(this, width, height, "HD Webcam C525", 30);//Modif PAscal
        video = new Capture(this, 640, 480,"/dev/video0",30);
        video.start();
        Timer_Intervalle=millis();
      }
      numPixels = video.width * video.height;
      backgroundPixels = new int[numPixels]; // Create array to store the background image
      // Make the pixels[] array available for direct manipulation
      loadPixels();
      textSize(15);
      debut=hour()+":"+minute();
    }

    //XXXXXXXXXXXXXXXXX  DRAW
    void draw() {
      background(#D29A9A);
      if(toggleLive==true)
      {
          if (millis()-Timer_Intervalle>IntervalleCapture) //
           {
              toggleDerniere=false;//pour déactiver automatiquement l'affichier de la derniere image capturée
              noTint(); // alpha 100%
              showmessage=false;
              NRB_CaptureEffectue=NRB_CaptureEffectue+1;
              for (int i=0;i<NBR_Image;i++)
              {
                if (video.available() == true)
                {
                  video.read();
                }
                image(video, 0, 0, width, height); // Draw the webcam video onto the screen
                seqNum=seqNum+1;
                switch (  str(seqNum).length())
                {
                case 1:
                  namePadding="00000";
                  break;
                case 2:
                  namePadding="0000";
                  break;
                case 3:
                  namePadding="000";
                  break;
                case 4:
                  namePadding="00";
                  break;
                case 5:
                  namePadding="0";
                  break;
                }
                delay(50);
                file_name = ""+String.valueOf(year())+""+rajouteZero(month())+""+rajouteZero(day())+"_"+rajouteZero(hour())+""+rajouteZero(minute())+"-"+rajouteZero(second())  ;
               //pour débugger text(" "+file_name+"_"+namePadding+seqNum, 10, 10);
                saveFrame(CheminRepertoireFichiers+file_name+"_"+namePadding+seqNum+".jpg");//modif Pascal
                DerniereImageCaptee=CheminRepertoireFichiers+file_name+"_"+namePadding+seqNum+".jpg";
               // println("=================",i,"=====================");
                NRB_ImagesEnregistre=NRB_ImagesEnregistre+1;
              }
              showmessage=true;
              Timer_Intervalle=millis();
            }//intervall
      }//end  if(toggleLive==true)
       if (video.available() == true)
        {
          video.read();
        }
        image(video, 0, 0, width, height); // Draw the webcam video onto the screen
        if(showmessage==true)
        {
          text("== Capture Active ==  \nnbrImage: "+str(NBR_Image)+"\nintervalle secondes: "+str(IntervalleCapture/1000)+"\n\nDécompte avant la prochaine capture:", 10, 15);
          textSize(196);
          text(""+ str( (IntervalleCapture-(millis()-Timer_Intervalle)) /1000),30,280);
          textSize(16);
          text("Débuté à "+debut+"\nNombre de capture:"+str(NRB_CaptureEffectue)+"\nNombre d'image enregistrées: "+str(NRB_ImagesEnregistre)+"\n"+CheminRepertoireFichiers, 10, height-80);
        }
        if(toggleLive==false)
        {
          text("==Mode Ajustement (pas de capture)== \nnbrImage: "+str(NBR_Image)+" \nintervalle secondes: "+str(IntervalleCapture/1000)+" \n\n\n-Barre d'espacement: Alterner entre le mode capture et le mode ajustement\n-Touche de 1 a 9: Modifier le nombre d'image enregistré a chaque capture\n-Fleche Haut/Bas: Augmenter/diminuer l'intervalle de temps entre les captures\n-[BackSpace]: Afficher la derniere image captée.\n-Touche n et b: Changer la couleur du texte a l'écran", 10, 15);
          text("Débuté à "+debut+"\nNombre de capture:"+str(NRB_CaptureEffectue)+"\nNombre d'image enregistrées: "+str(NRB_ImagesEnregistre)+"\n"+CheminRepertoireFichiers, 10, height-80);
        }
       if(toggleDerniere)// pour affichier la derniere image capturée
        {
          derniere = loadImage(DerniereImageCaptee);
          image(derniere, 0, 0);
          text(DerniereImageCaptee,25,25);
       }
     }

    void keyPressed()
    {
     if (key >= '0' && key <= '9') {
       NBR_Image = key - '0';
     }
      switch (keyCode)
      {
        case UP:
         IntervalleCapture=IntervalleCapture+1000;
         Timer_Intervalle=millis();
          break;
        case DOWN:
           IntervalleCapture=IntervalleCapture-1000;
           Timer_Intervalle=millis();
          break;
        case LEFT:
          break;
        case RIGHT:
          break;
      }
      if (IntervalleCapture<1000)IntervalleCapture=1000;
      if (IntervalleCapture>3600000)IntervalleCapture=3600000;//une heures
      switch (key)
      {
        case BACKSPACE: //
        if(DerniereImageCaptee!="VIDE")//flag pour affichier la derniere image capturée
         {
          toggleDerniere=!toggleDerniere;
          }
         break;
        case ' ': // activer la capture
          if (toggleLive ==false)
          {
          toggleLive = true;
          Timer_Intervalle=millis();
          showmessage=true;
        } else {
          toggleLive = false;
          showmessage=false;
        }
          break;
       case 'n': // noir
          fill(0);
          break;
        case 'b': //blanc
          fill(255);
          break;
      }
    }

    String rajouteZero(int tmp)
    {
      String ret=str(tmp);
      if (ret.length()==1)
      {
        ret="0"+ret;
      }
      return ret;
}
It's known that the end result of image processing in the brain is a small number of orthogonal (at right angles in higher dimensional space) categories. People's faces are recognized by something like 50 such categories.
I am just right at the beginning of trying the idea with associative memory to see if something similar is possible in software.
There is a lot more experimenting to do like making the AM nonlinear etc. The idea is that you gradually refine (layer by layer) a very large number of weak associations from a very large number of examples down to a small number of distinct categories. At the moment you can criticize the code a lot. Anyway:
AM[] nets=new AM[3];
AMCat am;
float[] inVec=new float[1024];

void setup() {
  size(100, 100);
  frameRate(1000000);
  nets[0]=new AM(1024, 10, .01f, 12345);
  nets[1]=new AM(1024, 100, .01f, 23456);
  nets[2]=new AM(1024, 100, .01f, 34567);
  am=new AMCat(1024, nets, 95);
  fill(255);
  textSize(26);
}

void draw() {
  background(0);
  char i=(char)random(33, 128);  //95 categories
  text(i, 0, 21);
  stroke(255);
  for (int x=0; x<32; x++) {
    for (int y=0; y<32; y++) {
      int c=get(x, y)&0xff;
      inVec[x+32*y]=c;
    }
  }
  int layer=frameCount>>12;  // divide by 1024*4
  if (layer<3) {
    am.train(inVec, i-33, layer);
  } else {
    frameRate(1);
    text((char)(am.recall(inVec)+33), 0, 21+32);
  }
}

class AMCat {
  int vecLen;
  int categories;
  float[][] catVecs;
  float[] workA;
  float[] workB;
  float[] outVec;
  AM[] nets;
  RP rp=new RP();

  AMCat(int vecLen, AM[] nets, int categories) {
    this.vecLen=vecLen;
    this.nets=nets;
    this.categories=categories;
    outVec=new float[categories];
    workA=new float[vecLen];
    workB=new float[vecLen];
    catVecs=new float[categories][vecLen];
    Xor128 rnd=new Xor128();
    for (int i=0; i<categories; i++) {
      for (int j=0; j<vecLen; j++) {
        catVecs[i][j]=rnd.nextFloatSym();
      }
      rp.wht(catVecs[i]);  //random Gaussian orthonal category vectors
    }
  }

  void recall(float[] cats, float[] inVec) {
    nets[0].recallVec(workA, inVec);
    for (int i=1; i<nets.length; i++) {
      nets[i].recallVec(workA, workA);
    }
    rp.wht(workA);
    for (int i=0; i<categories; i++) {
      cats[i]=workA[i];
    }
  }

  int recall(float[] inVec) {
    recall(outVec, inVec);
    float max=outVec[0];
    int pos=0;
    for (int i=1; i<categories; i++) {
      if (outVec[i]>max) {
        max=outVec[i];
        pos=i;
      }
    }
    return pos;
  }

  void train(float[] inVec, int cat, int level) {
    if (level==0) {
      nets[0].trainVec(catVecs[cat], inVec);
      return;
    } else {
      nets[0].recallVec(workA, inVec);
    }
    for (int i=1; i<level-1; i++) {
      nets[i].recallVec(workA, workA);
    }
    if (level<nets.length-1) {
      nets[level].trainVec(catVecs[cat], workA);
      return;
    } else {
      java.util.Arrays.fill(workB, 0f);
      workB[cat]=1f;
      rp.wht(workB);
      nets[level].trainVec(workB, workA);
    }
  }
}

class AM {
  RP rp=new RP();
  int vecLen;
  int density;
  float rate;
  int hash;
  float[][] weights;
  float[][] surface;
  float[] workA;
  float[] workB;
  // vecLen must be 2,4,8,16,32.....
  AM(int vecLen, int density, float rate, int hash) {
    this.vecLen=vecLen;
    this.density=density;
    this.rate=rate/density;
    this.hash=hash;
    weights=new float[density][vecLen];
    surface=new float[density][vecLen];
    workA=new float[vecLen];
    workB=new float[vecLen];
  }

  void recallVec(float[] resultVec, float[] inVec) {
    rp.adjust(workA, inVec);
    java.util.Arrays.fill(resultVec, 0f);
    for (int i=0; i<density; i++) {
      rp.signFlip(workA, hash+i);
      rp.wht(workA);
      // rp.signOf(surface[i], workA);
      System.arraycopy(workA, 0, surface[i], 0, vecLen);
      for (int j=0; j<vecLen; j++) {
        resultVec[j]+=weights[i][j]*surface[i][j];
      }
    }
  }

  void trainVec(float[] targetVec, float[] inVec) {
    recallVec(workB, inVec);
    for (int i=0; i<vecLen; i++) {
      workB[i]=targetVec[i]-workB[i];
    }
    for (int i=0; i<density; i++) {
      for (int j=0; j<vecLen; j++) {
        weights[i][j]+=workB[j]*surface[i][j]*rate;
      }
    }
  }
}

final class RP {
  final Xor128 sfRnd=new Xor128();
  // Walsh Hadamard Transform  vec.length must be (2,4,8,16,32.....)
  void wht(float[] vec) {
    int i, j, hs=1, n=vec.length;
    float a, b, scale=1f/sqrt(n);
    while (hs<n) {
      i=0;
      while (i<n) {
        j=i+hs;
        while (i<j) {
          a=vec[i];
          b=vec[i+hs];
          vec[i]=a+b;
          vec[i+hs]=a-b;
          i+=1;
        }
        i+=hs;
      }
      hs+=hs;
    }
    for ( i=0; i<n; i++) {
      vec[i]*=scale;
    }
  }

  void signFlip(float[] vec, int h) {
    sfRnd.setSeed(h);
    for (int i=0; i<vec.length; i++) {
      int x=(int)sfRnd.nextLong()&0x80000000;
      // Faster than -  if(h<0) vec[i]=-vec[i];
      vec[i]=Float.intBitsToFloat(x^Float.floatToRawIntBits(vec[i]));
    }
  }

  // converts each element of x to +1 or -1 according to its sign.
  void signOf(float[] biVec, float[] x ) {
    int one=Float.floatToRawIntBits(1f);
    for (int i=0; i<biVec.length; i++) {
      biVec[i]=Float.intBitsToFloat(one|(Float.floatToRawIntBits(x[i])&0x80000000));
    }
  }

  void adjust(float[] resultVec, float[] x) {
    float sumsq=0f;
    for (int i=0; i<x.length; i++) {
      sumsq+=x[i]*x[i];
    }
    float v=sqrt(sumsq/x.length);
    if (v<1e-20f) {
      signOf(resultVec, x);
    } else {
      v=1f/v;
      for (int i=0; i<x.length; i++) {
        resultVec[i]=v*x[i];
      }
    }
  }
}

// Random number generator
final class Xor128 {

  private long s0;
  private long s1;

  Xor128() {
    setSeed(System.nanoTime());
  }

  public long nextLong() {
    final long s0 = this.s0;
    long s1 = this.s1;
    final long result = s0 + s1;
    s1 ^= s0;
    this.s0 = Long.rotateLeft(s0, 55) ^ s1 ^ s1 << 14;
    this.s1 = Long.rotateLeft(s1, 36);
    return result;
  }

  public float nextFloat() {
    return (nextLong()&0x7FFFFFFFFFFFFFFFL)*1.0842021e-19f;
  }

  public float nextFloatSym() {
    return nextLong()*1.0842021e-19f;
  }

  public boolean nextBoolean() {
    return nextLong() < 0;
  }

  public void setSeed(long seed) {
    s0 = seed*0xBB67AE8584CAA73BL;
    s1 = ~seed*0x9E3779B97F4A7C15L;
  }
}
Hi all. This is my new project.
https://ycatch.github.io/blockp5.js/p5/code/
https://github.com/ycatch/blockp5.js
Try it !